Monday, December 28, 2009
Monday, December 14, 2009
Machine Phase Sphere Trailer Re-Make
i'm re-making a trailer for my machine phase project that i started back in 2006. i want to upgrade the look and use some of the new tools and techniques i've learned over the past few years as well as finishing it this time. the link below is for the original trailer, it's a 122mg mov file:
----------
my good friend TIM BOXELL did the storyboards. i've made some changes along the way:
----------
shot 01 the waterfall is first. i'm going to re-make the cliffs. i used the previous max files and the corresponding cameras and placement of objects as my starting place. i created a new plane object and placed it on the right side. the length and width and set to 100 segments each, the density setting, similar to meshsmooth, is set to 12. we will be using displace to create to rock formations and thus need lots of topology.
----------
next i created the two displacement masks that will create the cliff's form. i used the gradient ramp for both, the one on the left is the main rock formation and the one on the right is the mask.
the resulting look.
the set up for the holes in the formation.
this is the resulting displacement.
and finally the render w/some rock textures applied.
----------
next i'd like to populate the surface w/different types of foliage. instead of using high polys trees i'm going to use a particle system to generate shrubs of various textures scattered across the surface of the rock form.
the first step is to create a copy of the cliff and name it cliff emiter01. right click on the object and uncheck Renderable, we don't want to see this object at render time. i then selected faces where the foliage would be emitted.
----------
i created a pf source, you can see in the set up it's very simple. i used position object and selected faces as the origin of from which the particles will emit (locked onto the rock object), the shape is a simple sphere w/mapping, some scale to create the different sized plants and lastly a multi sub object material that is applied at random. the textures are various images of plants and leaves that are masked in the opacity slot by various black and white images of leaves. (i also created the cliff on the other side by copying the first one and changing the noise values for displacement so they each look a bit different.)
----------
i used vray w/the default sun light and camera settings.
----------
the final result.
----------
the main waterfall is created w/particle flow and is rendered on it's own w/the standard max scanline renderer.
----------
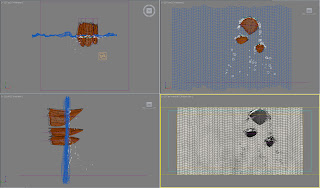
next is the set up for the rocks poking out of the main waterfall and creating about 6 or 7 smaller waterfalls. the scene contains deformed spheres for the rocks, lower rez copies for the deflection objects, a deforming plane that keeps particles from going behind the waterfall, the spacewarps drag, gravity and 4 deflectors that upon collision delete particles. this scene is also rendered using the standard max scanline renderer.
----------
the particle flow layout. using a large number of smaller particles that are emitted from thin strips of polys right above each rock, using the spacewarps drag and gravity each particle is pulled downward and either collides w/a deflector that deletes it or bounces it off the rocks and to the next deletion plane.
----------
i added another particle system to create the foliage on the rocks just like the cliff example. this is the final render.
the final image has a few extra elements added, the falling sphere and resulting trail (didn't make any changes), the bird (no changes) and 3 trees in the foreground that have animated noise modifiers added to a soft selection of vertices to create some wind like movement.
i'll upload the resulting animation as soon as it's done!
----------
Tuesday, December 8, 2009
Wednesday, December 2, 2009
Catch Me, Kill Me//Making of pg 23//part five
i re-thought panel four and decided to make a full page image as a background since the conversation was ending and transitioning to something new. i resurrected a scene i created years ago as the back plate image that depicts hologram dancers in a club and then comped dante, vargas and orbit into the render.
----------
i rendered and comped in some hologram dancers.
---------
then i did some photoshop to get here.
----------
i also added a gradient from the top left corner to the bottom right corner so that the background doesn't over power the beginning of the page.
----------
using the newly created page as a background, i matched up the camera and lights and was able to get a good render of vargas pretty quickly.
----------
dante didn't corporate as much. this image took about a week of renders to work out the lighting, materials and hair.
----------
in addition to working out the lighting i had several issues w/the hair not rendering. for those of you that use the hair and fur in max it sometimes isn't obvious how or why it won't render. i've found that in most cases you can adjust the tile memory usage number, located in the environment & effects window, from the default 70 to something higher. in my case i was using 2048. @ this rez 2550x3300 max was crashing when it rendered the hair, thru trial and error i figured out that lowering this number to 1024 solved my problem. i have also noticed that hair and fur created in previous versions of max don't render completely and i've had to delete the modifiers and re-create the hair from scratch in order to solve the problem.
----------
next are the renders for orbit, same as before i animated him flying thru the panel and used the vray motion blur. after compositing all the images together i selectively picked out the ones w/the most impact that don't get in the way of the rest of the image. in photoshop i blurred and duplicated the different orbits for more motion blur.
Sunday, November 29, 2009
Catch Me, Kill Me//Making of pg 23//part four
this is a simpler shot basically created in DOF. in the image you can see you must have a lower f-number to create DOF w/the vray camera. i also labeled the lights according to their function.
----------
using the setup from the previous maxfile i rendered the amount separate and comped it in. the image on the right is the final using the diffuse glow technique from an earlier post.
----------
Tuesday, November 24, 2009
Catch Me, Kill Me//Making of pg 23//part three
while watching the morning headlines on cnn...
adam lambert's appearance for good morning america has been canceled? NO!!!!!!!!
----------
second panel: i'm starting w/the vargas max file created for the previous panel and making adjustments to camera and lights to match the storyboards for panel two.----------
samething /w dante.
----------
after putting them together and in addition to some curves and brightness/contrast i also moved dante's hand closer to his face for a better on screen balance.
----------
one extra note: i take one more step before finishing the image whereby i flatten the layers, select all, copy, paste, switch modes to screen, adjust opacity and then blur the image. this gives a soft diffuse glow to the image. i don't do this exactly the same way every time but this is the basic workflow.
----------
----------
Friday, November 20, 2009
Catch Me, Kill Me//Making of pg 23//part two
venti vanilla bean frap w/3 add shots, stoney gomez groove... and art... starting now...
----------
had to vacuum...
----------
because vargas and dante are in the same convo as the previous page i'm able to use the lighting and basic scene setup as before and just move the camera around. you can see i put the vargas render in the background as reference to help pose and light dante. the image shows the 3d scene set up, the story board and the render of dante.
----------
after putting dante and vargas into the same image the lighting isn't working at all. i'd like to have some edge lighting on each of them coming from behind and try to put the importance on their dialogue.
----------
i moved some lights around vargas to create some rim lighting, turned down the fill light.
----------
same for dante.
----------
orbit, did a little animation and used the vray motion blur.
----------
w/no post on the right, on the left some photoshop curves, brightness/contrast and some of my background elements from previous panels for the environment.
----------
some word balloons and adjustments to orbit, i animated him over 10 frames and rendered w/motion blur in vray, and we have the first of four panels!
----------
Thursday, November 19, 2009
Catch Me, Kill Me//Making of pg 23//part one
i'm going to walk you thru the making of one graphic novel page from start to finish. so if you have nothing else to do or are bored or maybe married, then fire up the popcorn maker and let's make some art!
FIRST, before i started anything i figured out what size and dpi each page would be and made myself a template:
----------
then i go to my story boards, created for me by the legendary TIM BOXELL:
----------
i copy the the story board into the psd file, pg 23 in this example, and size it according to the borders of the psd factoring in bleed @ print time. a note about pg numbers, going by tim's numbering i'm on pg 25, going by what pg i'm on its pg 23, i'm an artist, it doesn't have to make sense.
----------
this page, 23, and the one before it, 22, are the same size and layout. i use the story board image as a guide in figuring out how big each panel should be, in this case there are 4 panels and each should be 1140x1565 pixels.
----------
now it's time to look at the first panel and start to translate it into 3d. each time i start a new page i look at the story boards and i go back to the script and look at previous pages to think about lighting, time, emotion, etc... it's important point out that i've already spent years creating characters to use in the graphic novel. in this example the artist pascal blanche designed, modeled and textured the character:
----------
we are going to start w/vargas, pimp of the universe, on the left hand side of the page. this is my set up of lights and cameras in max. i'll go into more details about my settings in max on the next render for now i want to show an overview on how each page is put together.
----------
this is the finished render out of max. for the moment this is working. once i get everybody in the shot i review lighting and materials.
----------
this is enough for now, i'm starting to bore myself. we will pose, light and render dante in the next round. ding!
----------
Subscribe to:
Posts (Atom)


